Leave a comment at the end of this page or email contact@krishagni.com
Monthly Protocol Report
Introduction
PI and site administrators would often want to generate a summary report for their protocol on a regular basis. This would help them given an idea of the collections happened so far. In OpenSpecimen v3.3, it is possible to set such reports per the protocol, which would send reports to the PI, Protocol Coordinators and the system administrator.
Report Configuration
Default Report Format
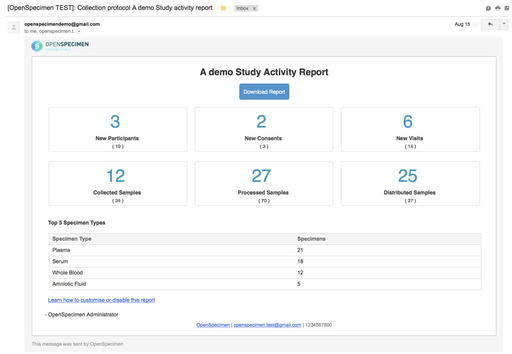
OpenSpecimen is packaged with a default report for all protocols. Below is the format of the email which is sent to the PI and system administrator:
- Metrics showing summary counts of different data collected in the previous month vs. the total count
- Top 5 collections by sample type
- Download report for exporting a detailed report
Change Default Report
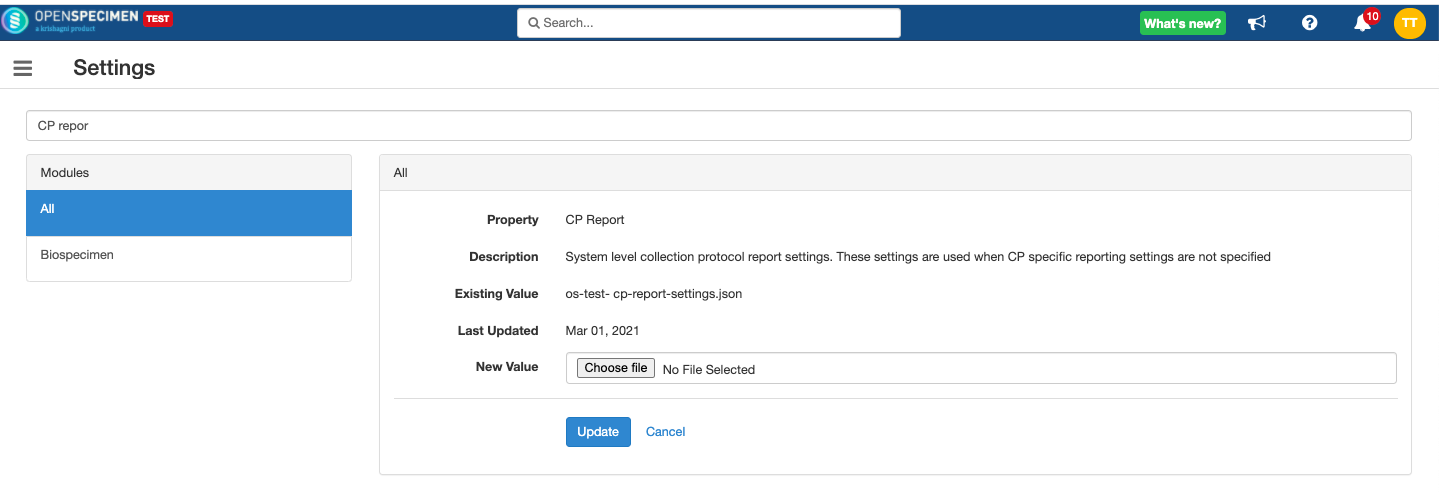
To change the default format for all protocols, go to Settings→Biospecimen Modules→'CP Report' property. Update with the new JSON to change the format or just update to disable monthly report for all protocols.
Click on cp-report-settings.json to download the default system-level CP report.
Change Protocol Specific Format
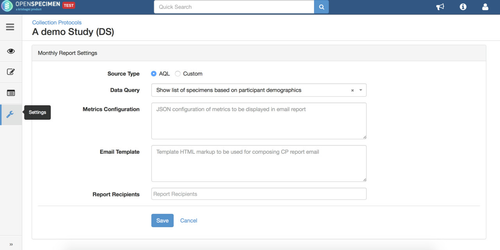
To change the format of the report for a specific protocol, go to the protocol details and click on the 'Settings' tab.
- Change the data query to any saved query: This allows the user to download the monthly report as CSV from the email automatically sent.
- Metrics configuration: Allows to change data fields shown as counts in the monthly report email.
- Email template: Change the format of the email
- Report recipients: In addition to PI, select additional users to whom the monthly report should be sent
Manual Report Generation
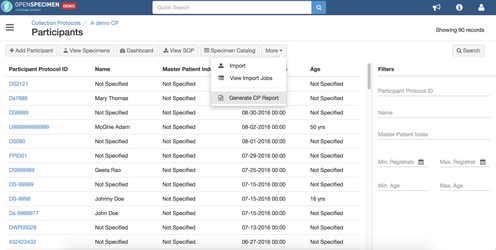
By default, the monthly report is atomically sent on a monthly basis. If the user wants to generate manually at any point, go to the protocol's participant or specimen list view and click on 'Generate CP Report' under 'More.'
Configuration Details
Source Type
Source type specifies whether the administrator wants to use a built-in AQL mechanism or their own custom implementation to generate data/metric.
Data Query
This dropdown is presented when an AQL data source is chosen. Administrators are presented with a list of saved queries to choose from for generating the data file attached in the report email.
Data Configuration
When custom source type is chosen, administrators need to specify additional details in the “Data Configuration” text box. An example configuration of “fictitious” custom data source is given below:
{
  "type": "org.myuniv.os.reporting.GenericSqlReporter",
  "sql": "select  patient.ppid from patients where reg_date between (sysdate - 30) and sysdate"
}
The variable “type” is reserved and used by reporting module to determine the Java class to instantiate for generating a report. The custom Java class should be an implementation of CollectionProtocolService.DataSource an interface and made available to reporting module via plugins or core app utilities. Any other variables (like SQL in the above example) in JSON are specific to the data source identified by “type.” The reporting module simply ignores them.
An example implementation of the above data source would follow the below pattern:
package org.myuniv.os.reporting;


//
// other imports
//

public GenericSqlReporter implements CollectionProtocolService.DataSource {
   public File getDataFile(CollectionProtocol cp, Map<String, Object> input) {
       //
       // read configured SQL for the CP
       //
       String sql = (String)input.get(“sql”);


       //
       // execute the query and obtain records
       //
       ResultSet rs = executeSql(cp, sql);


       //
       // write records to file and return the generated file,
       // which the reporting module uses to attach in report email
       //
       return writeToFile(rs);
   }
}
This mechanism allows adopters to implement any kind of a report of whatever complexity without breaking the sweat.
Metrics Configuration
CP Level Metrics Example
{
	"patients": {
		"type": "AQL",
		"aql": "select count(Participant.id) where date_range(Participant.regDate, last_cal_month)"
	},

	"aliquots": {
		"type": "AQL",
		"aql": "select count(Specimen.id) where Specimen.lineage = \"Aliquot\" and Specimen.availableQty > 0 and date_range(Specimen.createdOn, last_cal_month)"
	}

}
System-level Metrics Example:
{
"metricsCfg": {
	"patients": {
		"type": "AQL",
		"aql": "select count(Participant.id) where date_range(Participant.regDate, last_cal_month)"
	},

	"aliquots": {
		"type": "AQL",
		"aql": "select count(Specimen.id) where Specimen.lineage = \"Aliquot\" and Specimen.availableQty > 0 and date_range(Specimen.createdOn, last_cal_month)"
	}
},
"emailTmplKey": "default_cp_report"

}
This example defines the configuration for 2 metrics - patients registered and aliquots created in the last calendar month. Discerning readers would notice metrics configuration follows the same template as the data configuration explained above. Users have the choice to use a built-in AQL data source to generate metrics or can use a custom data source.
The metric values are made available in variables “patients” and “aliquots” that can be used in the report email explained in the next section.
"emailTmplKey" → Used the built-in system-level email template.
Email Template
Administrators can customize the report email template by specifying any plain/HTML text. An example template using the above metric variables is given below. $patient and $aliquots correspond to metric variables defined in the above section. $dataFile is a special variable exposed by reporting module to refer generated data file. $appUrl is OpenSpecimen in-built variable available for all email templates and refers to the URL used to access OpenSpecimen.
CP level email template example:
#macro(getNumber $result)
  #if ($result && $result.getRows() && $result.getRows().size() > 0 && $result.getRows().get(0).size() > 0)
    $result.getRows().get(0)[0]
  #else
    N/A
  #end
#end

<table>
  <tbody>
    <tr>
      <td>New Patients: </td>
      <td> #getNumber($patients) </td>
    </tr>
    <tr>
      <td> Aliquots Created: </td>
      <td> #getNumber($aliquots) </td>
    </tr>
    <tr>
      <td> Data File: </td>
      <td> <a href="$appUrl/rest/ng/collection-protocols/$cpId/report?fileId=$dataFile">Data Report</a> </td>
  </tbody>
</table>
System-level email template: Please refer to the "emailTmpl" section in the below JSON.
{
"metricsCfg": {
    "patients": {
        "type": "AQL",
        "aql": "select count(Participant.id) where date_range(Participant.regDate, last_cal_month)"
    },

    "aliquots": {
        "type": "AQL",
        "aql": "select count(Specimen.id) where Specimen.lineage = \"Aliquot\" and Specimen.availableQty > 0 and date_range(Specimen.createdOn, last_cal_month)"
    }
},

"emailTmpl":"#macro(getNumber $result) #if ($result && $result.getRows() && $result.getRows().size() > 0 && $result.getRows().get(0).size() > 0) $result.getRows().get(0)[0] #else N/A #end #end <table> <tbody> <tr> <td>New Patients: </td> <td> #getNumber($patients) </td> </tr> <tr> <td> Aliquots Created: </td> <td> #getNumber($aliquots) </td> </tr> <tr> <td> <a href='https://openspecimen.atlassian.net/wiki/x/DgCPAw'>Learn how to customise or disable this report</a> </td> </tbody> </table>"

}
Recipients
List of users to whom report email should be sent.
Scheduling
As of version v3.4, there is no mechanism to schedule report generation on a per CP basis. There is a single CP reporting job, which by default runs on the 1st day of every calendar month at 01:10 am, iterates through the list of CPs enabled for reporting and generates a corresponding report. In other words, all CP reports are generated on the same day at the same time.
Disabling reports
At CP level
- Go to the overview page of the CP.
- Click on Setting tab → Monthly report.
- Click on Disable button.
At system level
- As a super admin, go to "Settings."
- Search for "CP Report"
- Click on update without doing anything.
- This will wipe out the default settings.
Related content
Leave a comment at the end of this page or email contact@krishagni.com


