| Table of Contents |
|---|
Introduction
OpenSpecimen supports importing CSV files to bulk upload data. Using this feature, you can add, update or delete data. This can be used for legacy data migration, integration with other instruments or databases, and adding/editing data in bulk.
| Info |
|---|
From V9.1 strict date parsing has been implemented. To use the date formats with single digit date or month formats, the format M/d/yyyy can be used. To create new date formats, refer to the wiki page. |
| Widget Connector | ||
|---|---|---|
|
Best practices
- When doing a large import, first test with a small subset of 10-100 10–100 rows. Many times the same mistake is committed in every row. That avoids waiting for a long time to get the results back with the same error in every row.
- For huge uploads, like 500K to 1+M, refer to "Tips and tricks to import large number of many records" below.
FAQs
Where is the option to bulk upload data through CSV files in OpenSpecimen?
Under every data, there is an import option on in the top right -left corner of the screen.

Which types of files can be imported?
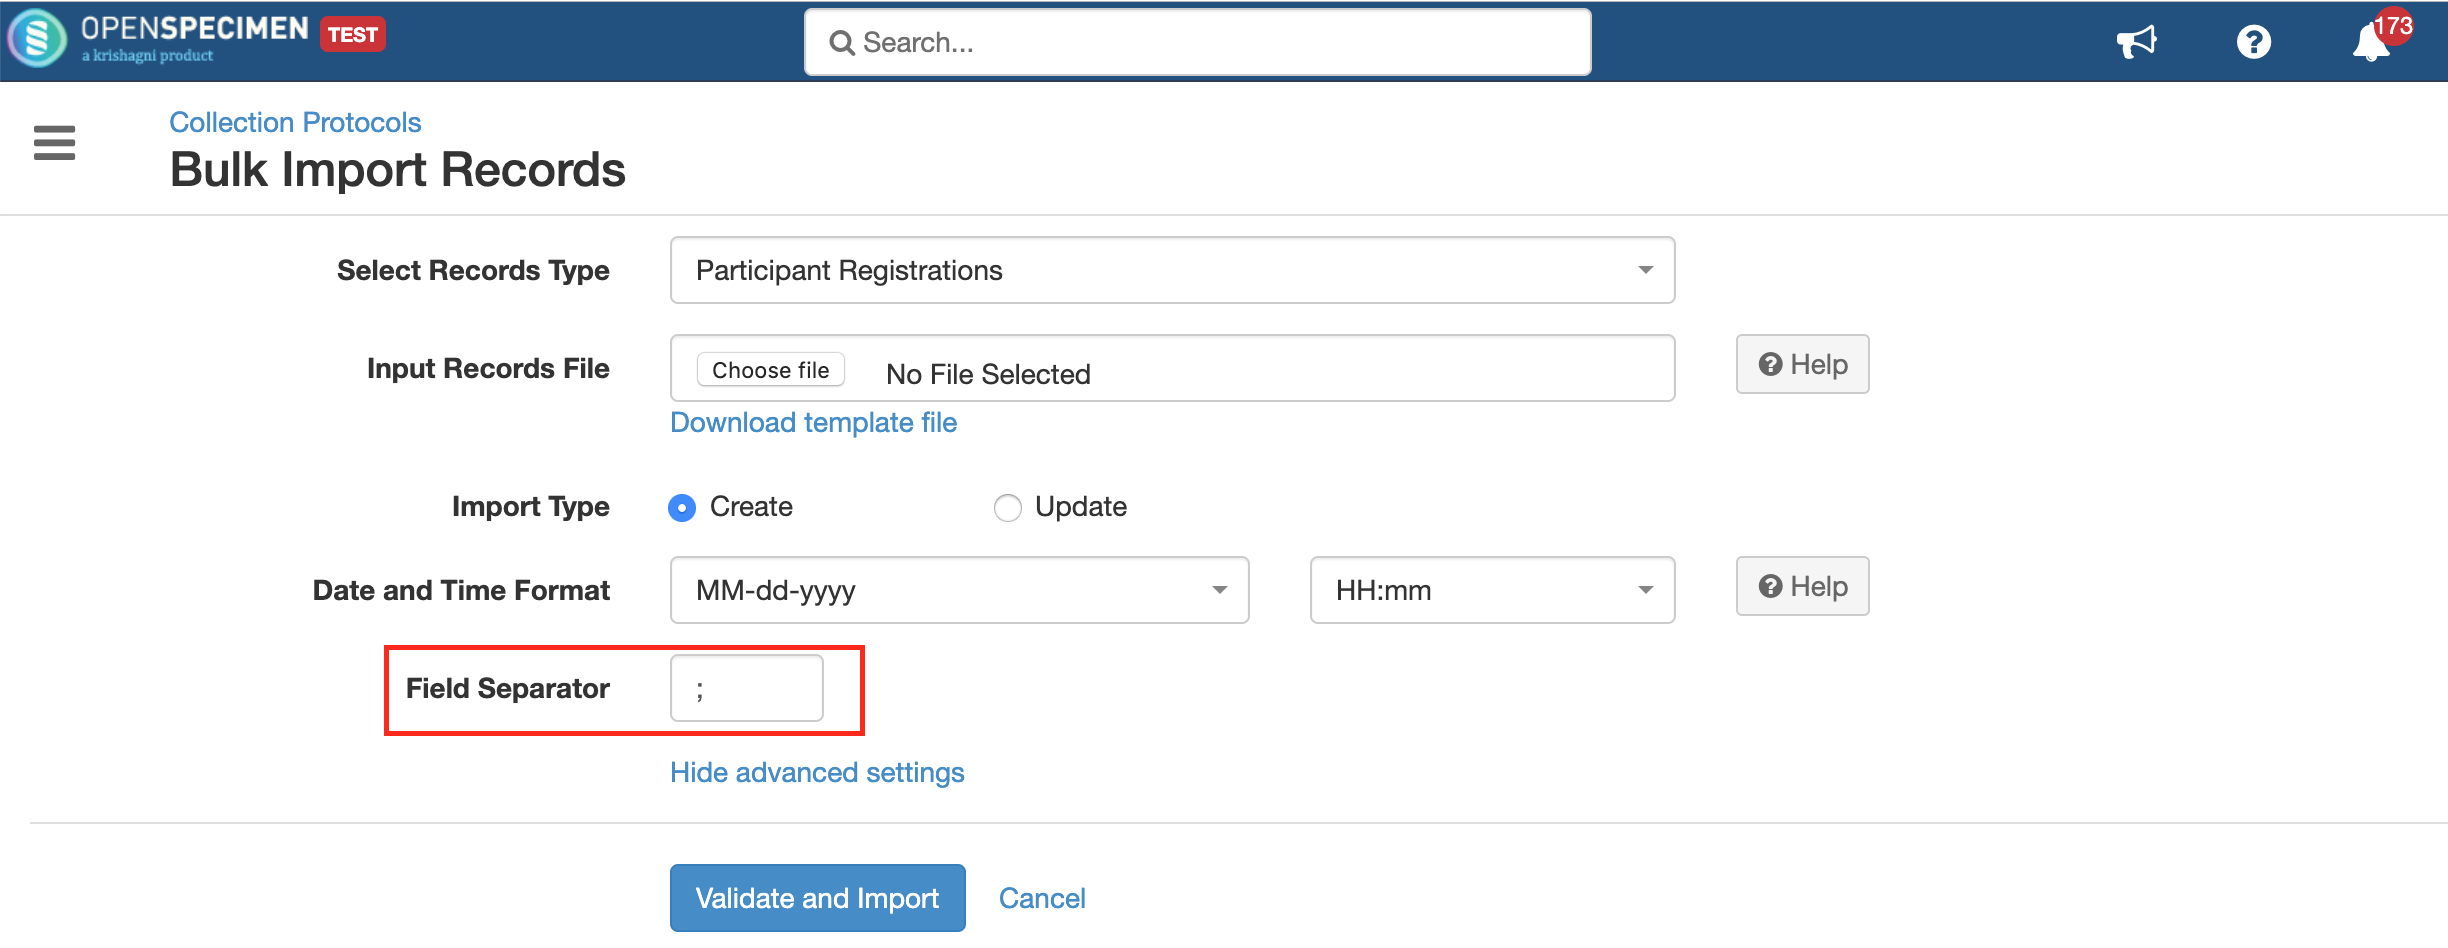
The data import file has to be in CSV (Comma Separated Values) format. From v6.1, OpenSpecimen supports semicolon-separated input files for bulk import. This is useful for files being imported from external devices(E.g. Liquid handling systems) which might be outputting data in different formats.
Can I import any CSV
...
files?
The data in the CSV file should be in specific template formats. The templates can be downloaded from the application under the import option for every data.
...
Yes, using the 'Master Specimens' template you can import participants, visits, and specimens in one go. For more details on import, refer to 'Master Template'
How do I check the status of the import?
Once the CSV file is imported, there is a report generated under 'View Past Imports' in the import feature. The dashboard will show the status of every data import.
| Expand |
|---|
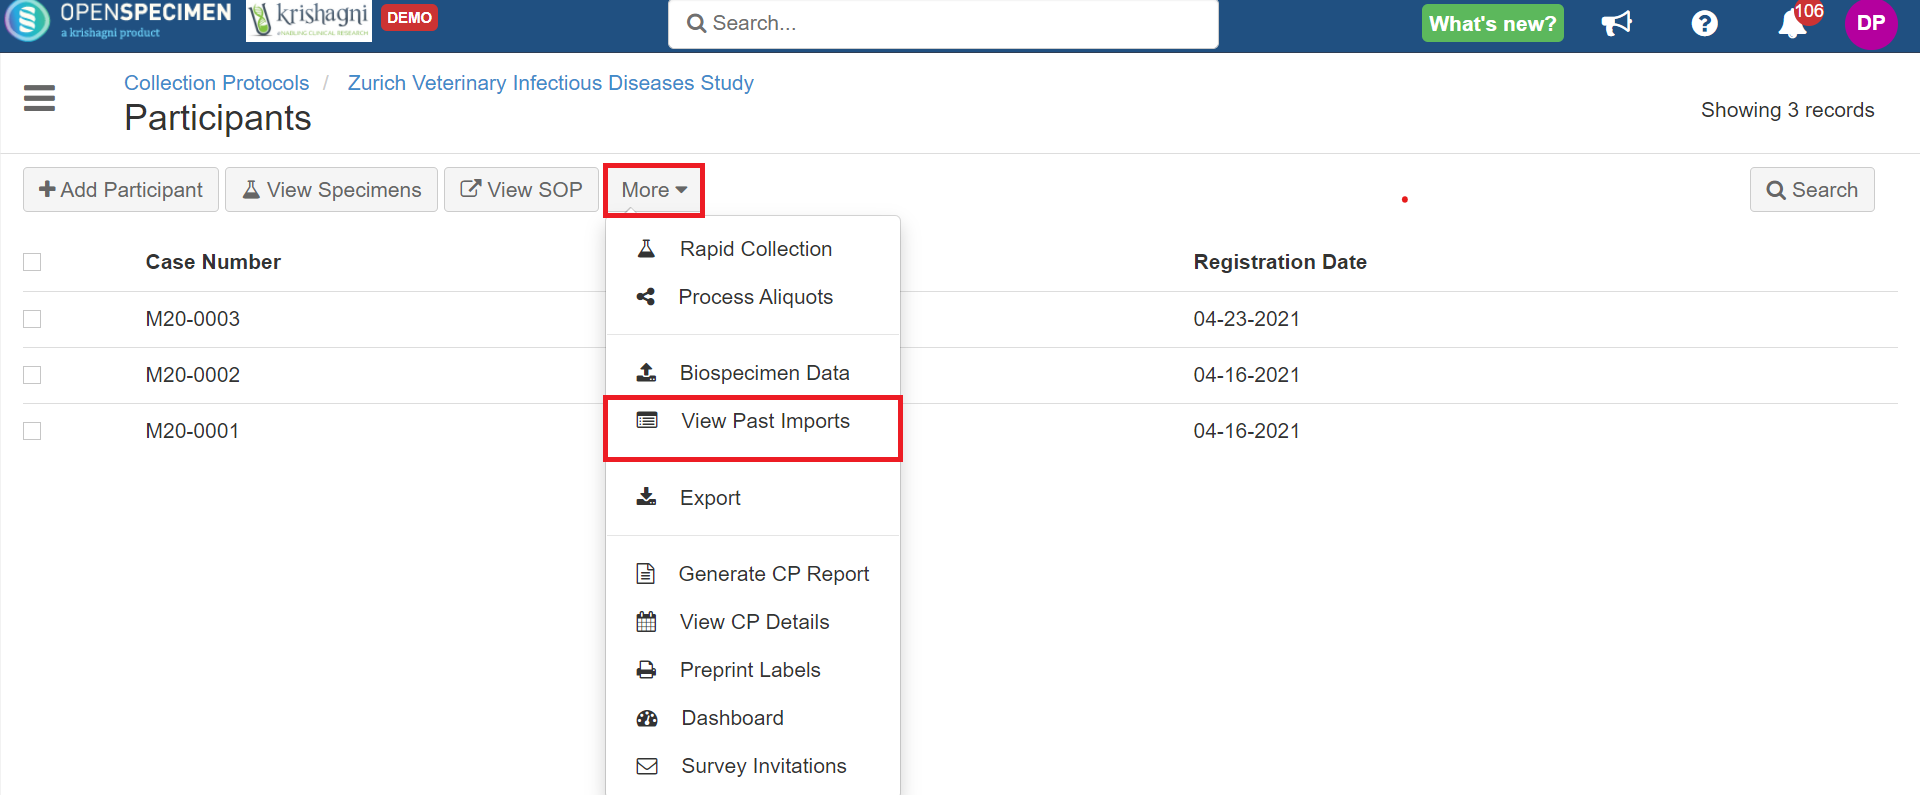
From the list view page, click on the 'Import' button → View Past Imports
If you are using bulk import with a CP, you can click on 'More' → View Past Imports
|

How will I know if there are errors?
Reports are generated for every data upload. These are available under 'View Past Imports'.
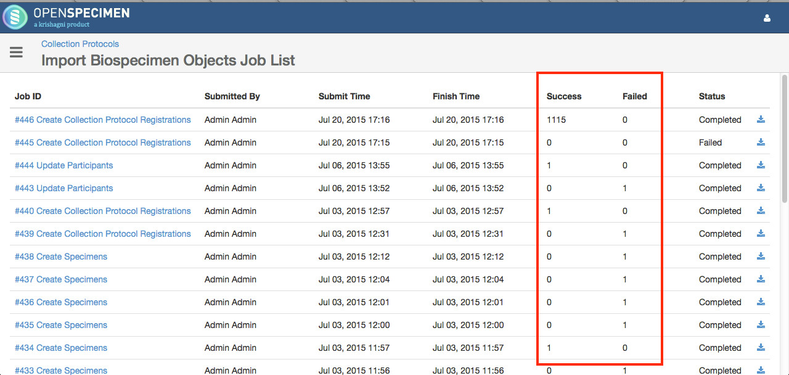
The report contains details about if a record upload was successful or failed. In case of failure, you can download the bulk import job file showing the import status and error showing reason of failure.

What do I do in case of errors?
The actual data in the application or in the data file needs to be corrected for the failed records and they can be re-uploaded.
Can I abort a bulk import job?
If you want to abort the bulk import job, click on the 'Abort' icon on the jobs page for the specific import job:
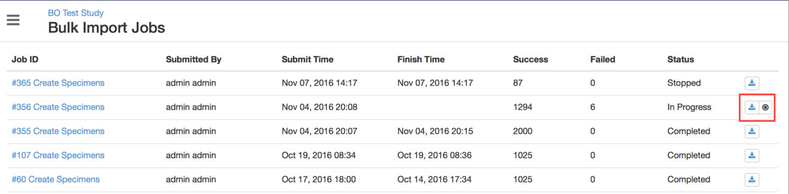
This will help if you have uploaded large files like 10k records and realize that there is a mistake in the records and would like to abort the bulk import job instead of waiting for the whole file to process.
| Info |
|---|
If the file is imported without validation, the data records are processed till the job is aborted and those records are not rolled back. |
Email Notifications
Email notifications are sent after the bulk import job is completed, failed, or aborted to the user who performed the bulk import. The email is also CCed to 'Administrator Email Address' set under Settings → Email.
Email Notifications
Email notifications are sent after the bulk import job is completed, failed, or aborted to the user who performed the bulk import. The email is also CCed to 'Administrator Email Address' set under Settings → Email.
Can the Super Admin view the import jobs of all users?
Yes, the "Super Administrator" can view the import jobs of all the users. Please note that the user can bulk upload the data from two places.
- Outside individual CP: i.e. from the Collection protocol list page (Collection Protocols → More → Import)
- For specific collection protocol (Collection Protocols → Participant List → More → Import)
The jobs will be visible to the Super Admin based on how the user uploaded the file. In other words, jobs uploaded at the global level won't be visible under specific CP and vice versa.
Users other than Super Admin can download or see only their imports. The system doesn’t know what is present in the file, so it restrict the access to only the users who have created the job or super admin.
Bulk Import Validations
The system validates the CSV for errors such as duplicate values in unique fields, incorrect date formats, incorrect dropdown values etc. Users can choose to validate the file before uploading any record.
Settings of validation before import
...
The validation does not happen in cases of large files. In such cases, data records are processed even if there are error records. By default, it is configured to 10,000, but it can be changed using admin settings:
...
To disable validation before importing, follow the steps:
Go to the home page, and click on the ‘Settings’ card.
Click on the ‘Common’ module and select the property ‘Pre-validate Records Limit’
Set ‘0’ for the ‘New Value’ field and click on ‘Update’
| Info |
|---|
Note: When validation is disabled, the system will show errors for failed records but will upload the success successful records. |
What is 'Validate and Import'?
In bulk upload, if 100 records are uploaded out of which 60 failed and only 40 records processed successfully, the user has to filter out the failed records, rectify and upload them again for reprocessing. The 'Validate and Import' feature validates the complete file before upload.
- If any record fails in inputting the CSV file, the whole job will fail and nothing will be saved in the database until all the records get succeeded.
- If there is any error, then the system returns the status log file with the proper error message for incorrect records so that the user is able to can rectify the incorrect records and upload again.
- The time required to validate the records is the same as that required to upload the records.
- The maximum number of records that can be validated in one job is set to 10000 by default. It can be changed from Settings → Common → Pre-validate Records Limit.
- If the records are more than 10k, the system shows a message 'Number of The number of records to import are greater than exceeds 10000, do you want to proceed without validating the input file?'.
- If you proceed without validation, then the records are processed individually.
Can the Super Admin view import jobs of all users?
Yes, "Super Administrator" can view the import jobs of all the users. Please note that the user can bulk upload the data from two places.
- Outside individual CP: i.e. from the Collection protocol list page (Collection Protocols → More → Import)
- For specific collection protocol (Collection Protocols → Participant List → More → Import)
The jobs will be visible to the Super Admin based on how the user uploaded the file. In other words, jobs uploaded at the global level won't be visible under specific CP and vice-versa.
Can the institute admin view import jobs of other users?
Yes, same as Super Admin. Institute Admin can view import of users from his/her institute.
Tips and tricks to import a large number of records
...
How do I check the status of the import?
Once the CSV file is imported, there is a report generated under 'View Past Imports' in the import feature. The dashboard will show the status of every data import.
| Expand |
|---|
From the list view page, click on the 'Import' button → View Past Imports
If you are using bulk import with a CP, you can click on 'More' → View Past Imports
|
How to avoid errors?
Watch the below video to learn about the common mistakes made during CSV import and how to avoid errors.
| Widget Connector | ||
|---|---|---|
|
How will I know if there are errors?
Reports are generated for every data upload. These are available under 'View Past Imports'.
The report contains details about if a record upload was successful or failed. In case of failure, you can download the bulk import job file showing the import status and error showing the reason of failure.
What do I do in case of errors?
The actual data in the application or in the data file needs to be corrected for the failed records, and they can be re-uploaded.
Can I abort a bulk import job?
If you want to abort the bulk import job, click on the 'Abort' icon on the jobs page for the specific import job:
This will help if you have uploaded large files like 10k records and realize that there is a mistake in the records and would like to abort the bulk import job instead of waiting for the whole file to process.
| Info |
|---|
If the file is imported without validation, the data records are processed until the job is aborted and those records are not rolled back. |
Tips and tricks to import many records
If you have a considerable number of data to import (say in 100s of K or millions), you can follow the below steps to improve the speed of data import:
- Do imports via folder import and not via the UI. Refer to Auto bulk import for this.
- Break the large file into smaller files. Say 100K specimens each. The problem with one large file is that it will take forever for the system to even read the file (i.e. before starting to even process the first row).
- If importing via UI, import the file as a Super Admin user. This will tell the system to not spend time doing privilege checks. This will automatically happen if you do the auto-bulk import by dropping the file in the server folder.
- Schedule the import during off-peak hours, e.g. daily from 5 PM to 8 AM the next day or weekend. You can do this by putting a fixed number of files in the folder, i.e. once you know 1 file of 100K takes 1 hour, then you can put say 14 files.