
Introduction
Manifests are PDF files that can be downloaded or printed after specimen collection, distribution, or shipment. It gives detailed information about the specimens and processing activities performed on them. The manifests can be configured based on protocol/distribution/project needs either at each individual level or system level.
Types of Manifest
The three types of manifest supported in OpenSpecimen are:
Specimen Collection Manifest
Order or Distribution Manifest
Request Manifest
Specimen Collection Manifest
Since the processing techniques vary, generating protocol-specific manifests should be possible. It can contain any data related to specimen, visit, or participant - including custom fields.
A clinic coordinator who has reading access to the visit can download a “Specimen Collection Manifest” from the participant’s visit page.
Default Specimen Manifest PDF
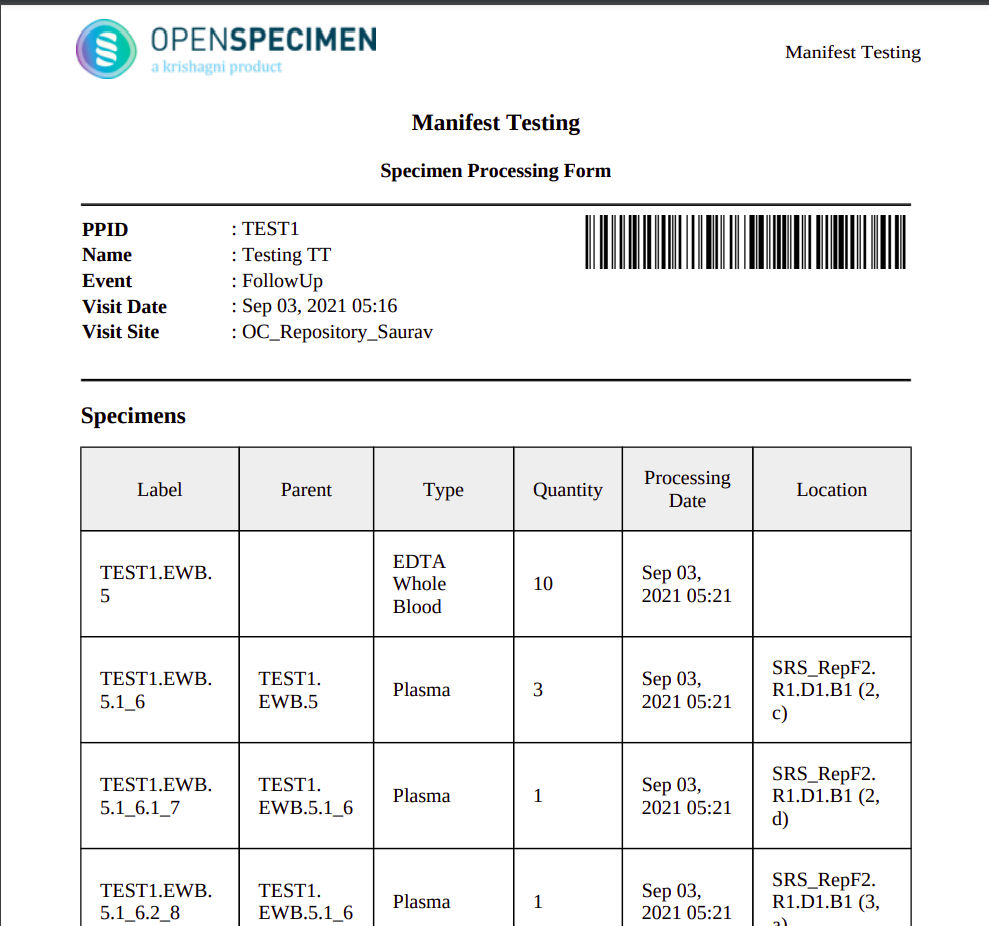
Distribution or Order Manifest
It is possible to configure the distribution manifests either at the distribution or system level. The order manifest can be downloaded from the Order overview page.
Request Manifest
Similarly, it is possible to configure the request manifest either at the project or system level. The request manifest can be downloaded from the request overview page.
Prerequisites
Before you start working on the manifest, Please make sure that HTML file format is accepted by OpenSpecimen for import. If this is not true, you will receive an error while uploading the manifest template as shown below: |

Steps to add the HTML file format
Go to Homepage → Setting → Search '‘Allowed File Type.’ Click on property ‘Allowed File Types' → Add 'html’ in the list separated by a comma → Update 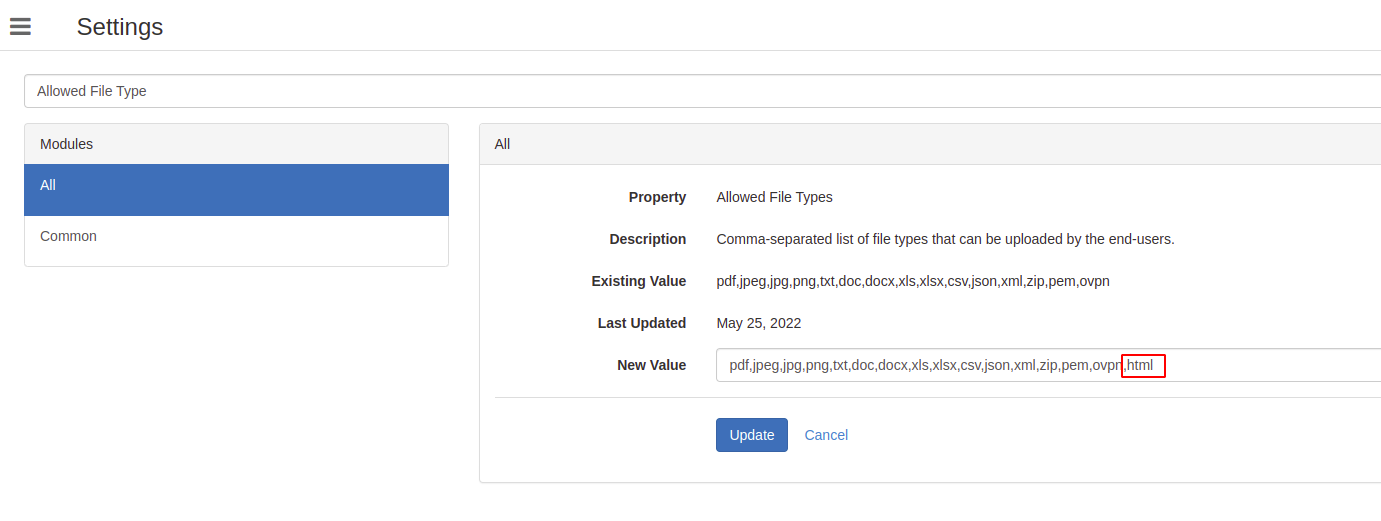 
|
Manifest HTML Templates
Manifest HTML Templates are customizable HTML files that are uploaded into the OpenSpecimen at the system or protocol/distribution/project level to generate a custom Manifest PDF. Based on your requirement you can add or remove fields, modify the specimen table, generate barcode/QR code, style and add texts, etc
Export Manifest Template
You can also export the manifest template from the system setting as well as individual protocol/distribution/project level.
Steps to export the default Manifest template
Go to Homepage → Setting → Search 'Manifest.’ Click on the link to download the manifest template of your choice. 
Before v8.2, the default manifest templates were shipped with the application and were not available for export from the system’s setting. For such cases, you can download and use the below default templates as per your need.
Default Specimen Collection manifest 
Distribution or Oder manifest 
Request manifest 
|
Steps to export protocol/distribution/project specific template
When no manifest is configured at any of the above levels you will get the following error message while downloading the template: [{"code":"MANIFEST_NOT_FOUND","message":"Manifest template is not configured."}]
|
Export specimen manifest template at the protocol level Go to the Homepage → Collection Protocol → Choose the CP of your choice → View CP Details On the CP overview page, click on the “More” → Export Specimens Manifest.
CP Overview Page 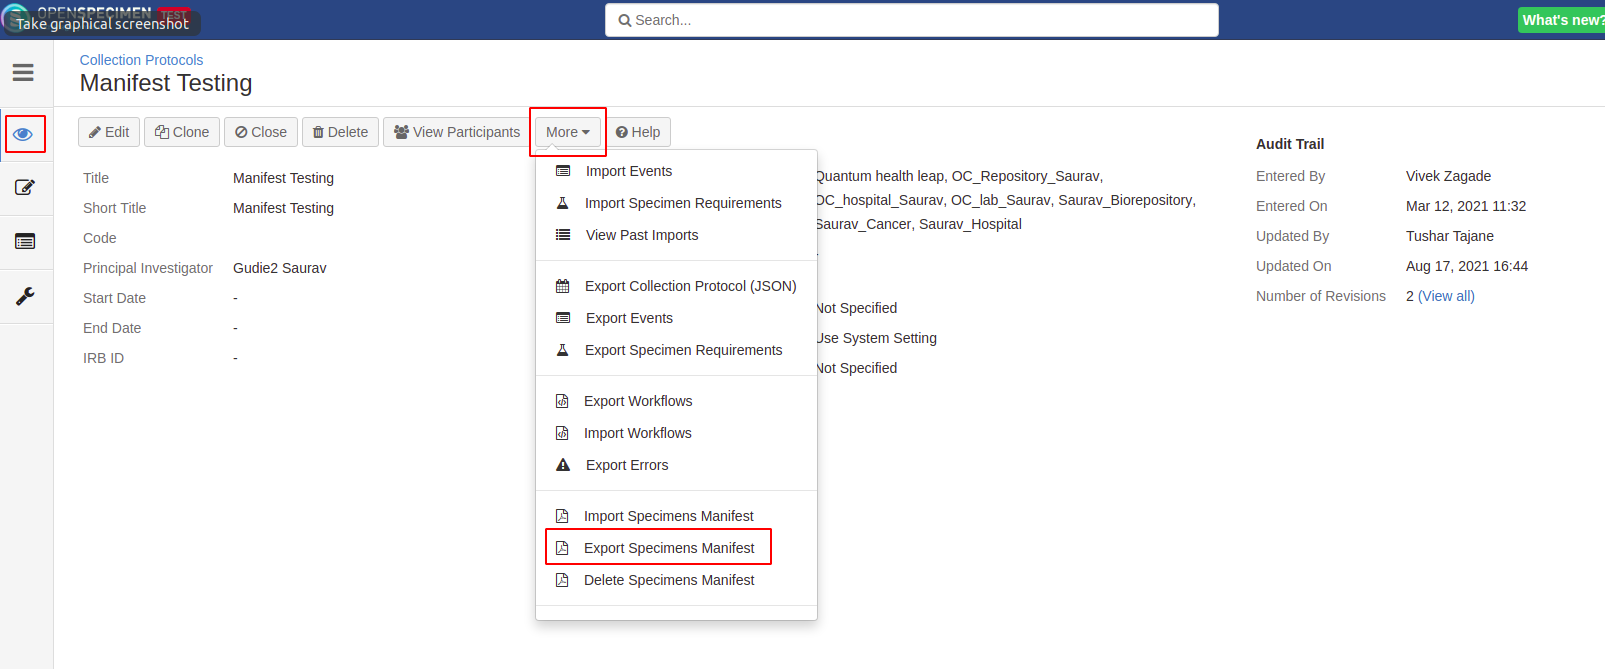 Export order manifest template at the distribution level Go to the Homepage → Distribution→ Choose the DP of your choice On the DP overview page, click on the “Manifest” → Download Template.
DP Overview Page  Export request manifest template at the project level Go to the Homepage → Project → Choose the Project of your choice On the Project overview page, click on the “Manifest Template” → Export.
Project Overview Page  |
Import Manifest Template
You can also import the manifest template at the system setting as well as individual protocol/distribution/project level. At the system level, the template will be applicable across all the protocols/distributions/projects available in OpenSpecimen whereas at the protocol/distribution/project level it will be specific to them. The manifest template at the individual level overwrites the system level configuration.
Steps to import Manifest Template at system
Steps to import protocol/distribution/project specific template
Import Specimen Manifest Template at the protocol level Go to the Homepage → Collection Protocol → Choose the CP of your choice → View CP Details On the CP overview page, click on the “More” → Import Specimens Manifest → Choose the file from your desktop → Import
CP Overview Page 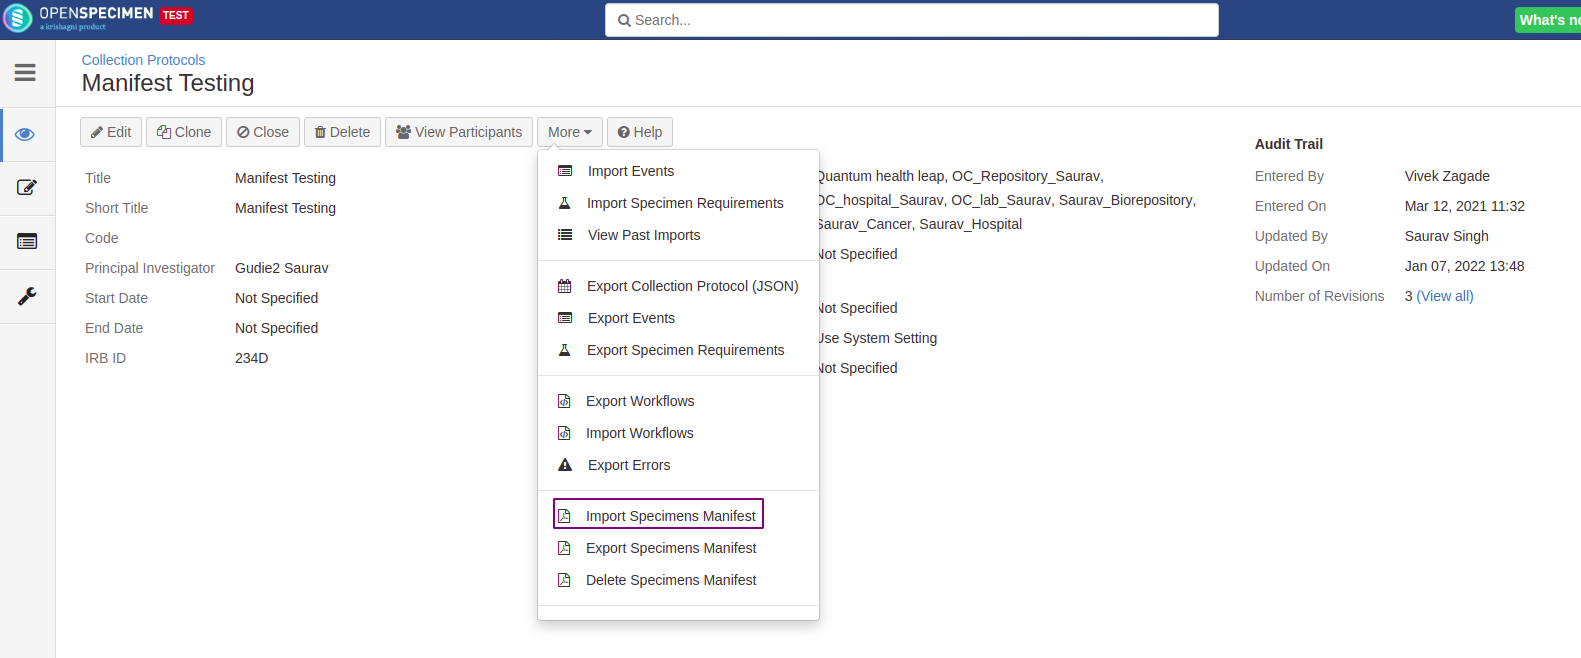 Import order manifest at the distribution level Go to the Homepage → Distribution→ Choose the DP of your choice On the DP overview page, click on the “Manifest” → Import Template → Choose the file from your desktop → Upload
DP Overview Page  Import request manifest at the project level Go to the Homepage → Project → Choose the Project of your choice On the Project overview page, click on the “Manifest Template” → Import → Choose the file from your desktop → Import
Project Overview Page  |
Downloading Manifest PDF
Steps to download manifest pdf for a visit/order/request
Download specimen collection Manifest PDF for a visit Go to the Homepage → Collection Protocol → Choose the Participant of your choice → Choose the visit (occured) of your choice. On the Visit overview page, click on 'Specimens Manifest'.
Visit Overview Page 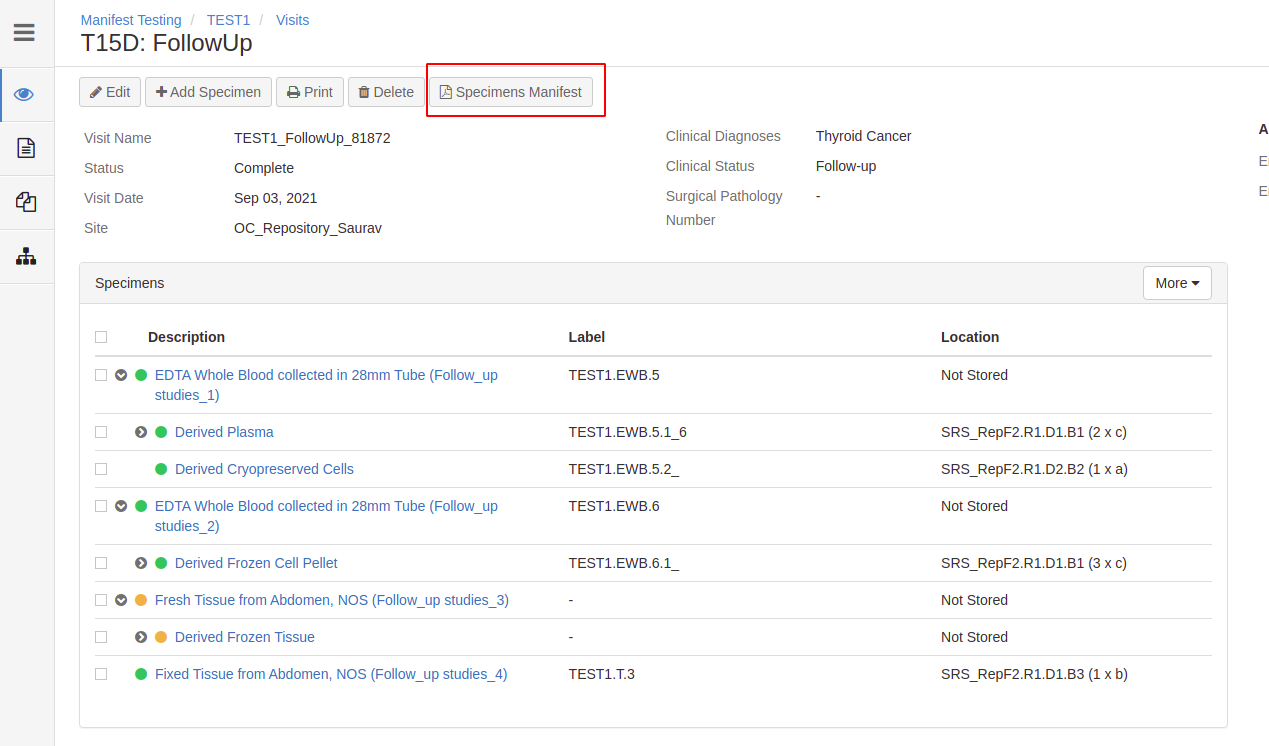 Default specimen collection manifest PDF 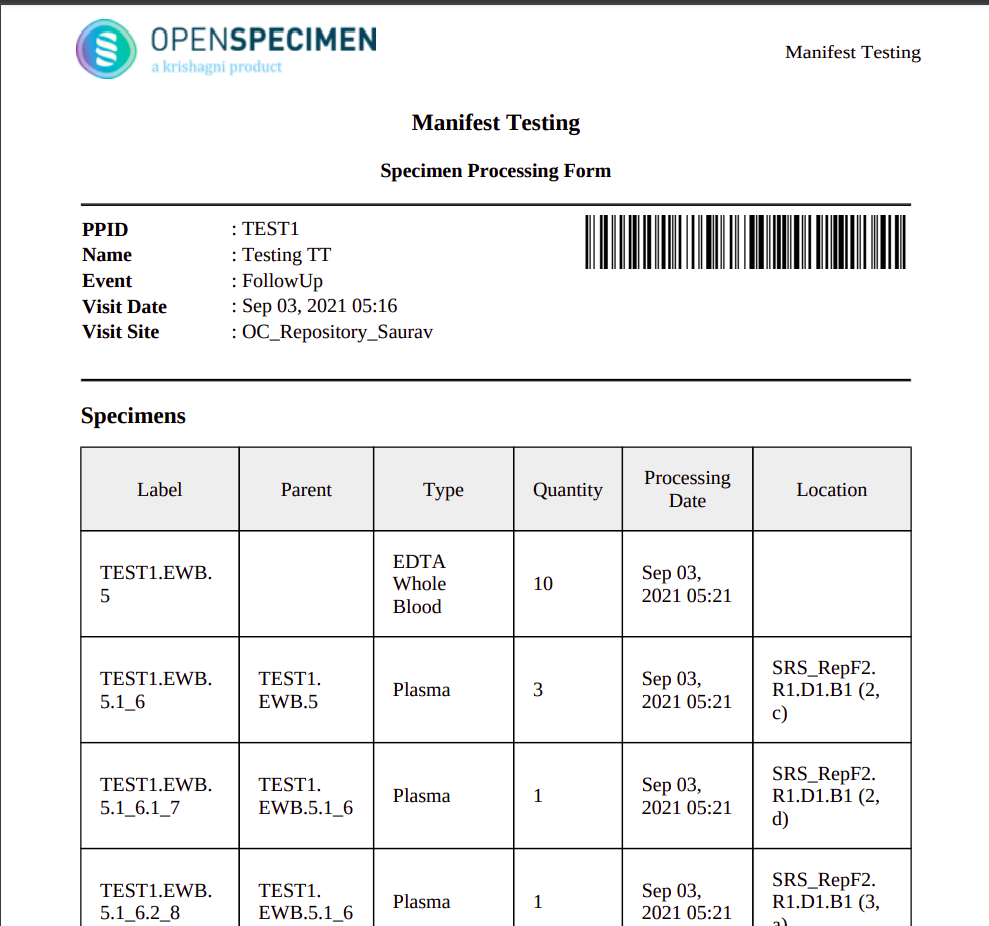 Download order manifest PDF Go to the Homepage → Orders → Choose the order of your choice. On the Order overview page, click on 'Manifest'.
Order Overview Page  Default order manifest PDF 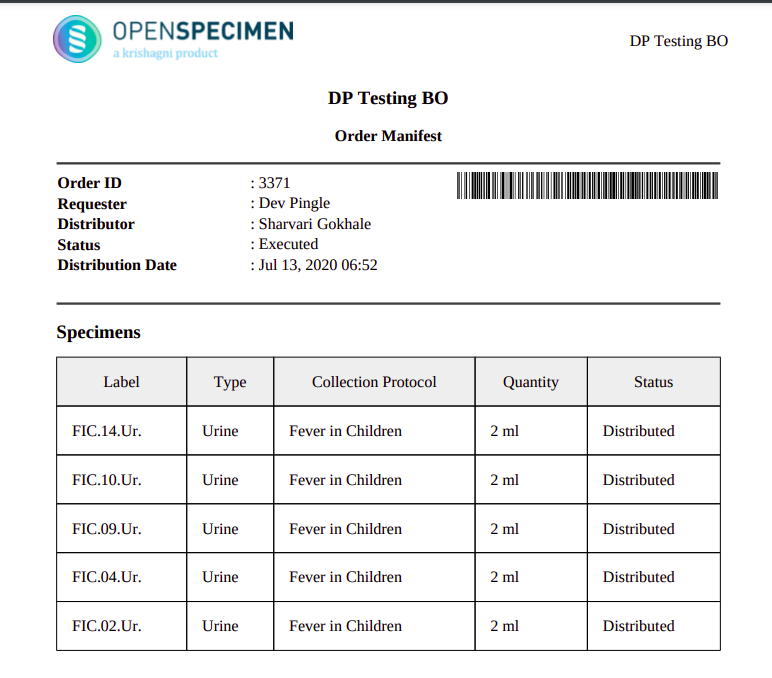 Download request manifest PDF Go to the Homepage → Project → View Requests → Choose the request of your choice On the Request overview page, click on 'Manifest'
Request Overview Page  Default request manifest PDF 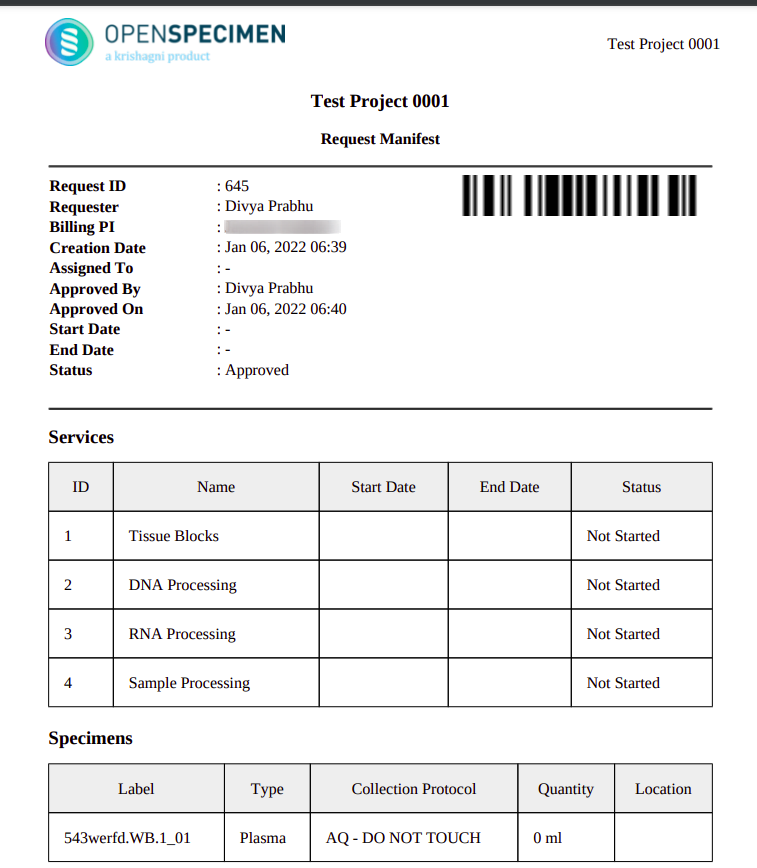 |
Customizing Manifest Template
Based on your requirement you can add or remove fields, modify the specimen table, generate barcode/QR code, style and add texts, etc
noteBefore configuring the manifest, it is good to have a backup file of the working manifest template.
The system-level template will be used when no template is configured at the CP level.
Before configuring the manifest, it is good to have a backup file of the working manifest template.
The system-level template will be used when no template is configured at the CP level.
Add default fields on the specimen table
Download the default manifest template file of your choice (for example visit.html) from the system setting as shown above. Open the template in the editor of choice. Go to the specimen table, add additional fields of your choice (for example “Lineage”) as shown below in the script, and save it. Follow the above steps to import the manifest template either at the system or individual level and download the manifest PDF for the same.
Script to add specimen lineage field on the specimen table ....
....
<h3> Specimens </h3>
<table class="specimens">
<thead>
<tr>
<th>Label</th>
<th>Parent</th>
<th>Type</th>
<th>Lineage</th>
<th>Quantity</th>
<th>Processing Date</th>
<th>Location</th>
</tr>
</thead>
<tbody>
#foreach ($spmn in $allSpecimens)
<tr>
<td>
#if ($spmn.label)
<span>$spmn.label</span>
#end
</td>
<td>
#if ($spmn.parentLabel)
<span>$spmn.parentLabel</span>
#end
</td>
<td>$spmn.type</td>
<td>
#if ($spmn.lineage)
<span>$spmn.lineage</span>
#end
</td>
<td>
#if ($spmn.status == 'Collected')
#if ($spmn.availableQty)
<span>$spmn.availableQty</span>
<span>$spmn.getQuantityUnit()</span>
#end
#elseif ($spmn.status == 'Pending' || !$spmn.status)
#if ($spmn.initialQty)
<span>$spmn.initialQty</span>
<span>$spmn.getQuantityUnit()</span>
#end
#end
</td>
<td>
#if ($spmn.lineage == 'New' and $spmn.collectionEvent.time)
<span>$dateFmt.format($spmn.collectionEvent.time)</span>
#elseif ($spmn.createdOn)
<span>$dateFmt.format($spmn.createdOn)</span>
#end
</td>
<td>
#if ($spmn.storageLocation.name)
<span>$spmn.storageLocation.name</span>
#if ($spmn.storageLocation.mode == 'TWO_D')
<span>($spmn.storageLocation.positionY, $spmn.storageLocation.positionX)</span>
#elseif ($spmn.storageLocation.mode == 'LINEAR')
<span>($spmn.storageLocation.position)</span>
#end
#end
</td>
</tr>
#end
</tbody>
</table>
....
.... |
Manifest PDF View 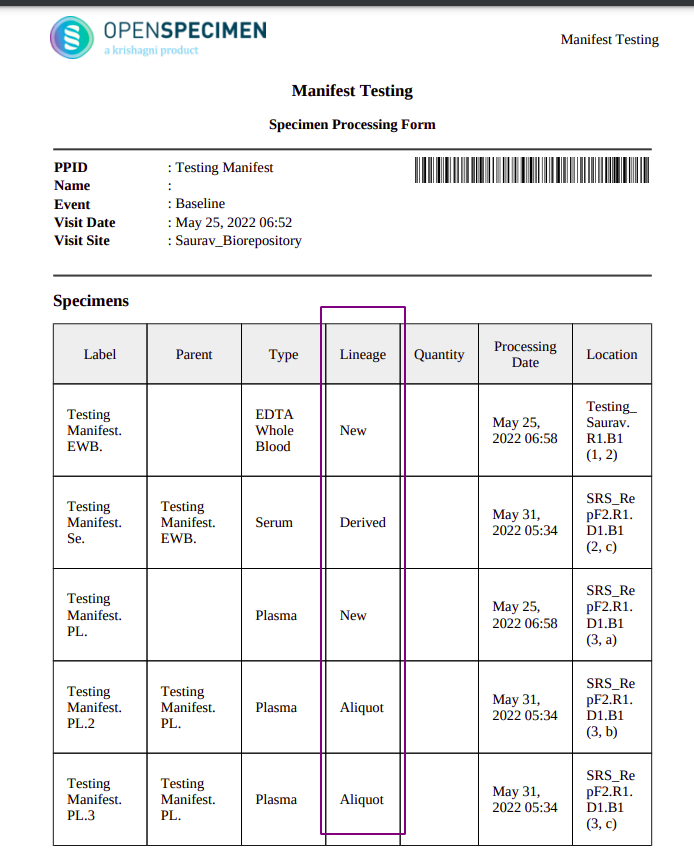  
|
Add custom fields on the specimen table
Download the default manifest template file of your choice (for example visit.html) from the system setting as shown above. Open the template in the editor of choice. Go to the specimen table, add additional custom fields of your choice (for example “Use Specimen for Research”) as shown below in the script, and save it. Follow the above steps to import the manifest template either at the system or individual level and download the manifest PDF for the same.
Script to add custom field on the specimen table ....
....
<h3> Specimens </h3>
<table class="specimens">
<thead>
<tr>
<th>Label</th>
<th>Parent</th>
<th>Type</th>
<th>Use Spcimen for Research</th>
<th>Quantity</th>
<th>Processing Date</th>
<th>Location</th>
</tr>
</thead>
<tbody>
#foreach ($spmn in $allSpecimens)
<tr>
<td>
#if ($spmn.label)
<span>$spmn.label</span>
#end
</td>
<td>
#if ($spmn.parentLabel)
<span>$spmn.parentLabel</span>
#end
</td>
<td>$spmn.type</td>
<td>
#if ($spmn.extensionDetail.attrsMap.use_specimen_for_research)
<span>$spmn.extensionDetail.attrsMap.use_specimen_for_research</span>
#end
</td>
<td>
#if ($spmn.status == 'Collected')
#if ($spmn.availableQty)
<span>$spmn.availableQty</span>
<span>$spmn.getQuantityUnit()</span>
#end
#elseif ($spmn.status == 'Pending' || !$spmn.status)
#if ($spmn.initialQty)
<span>$spmn.initialQty</span>
<span>$spmn.getQuantityUnit()</span>
#end
#end
</td>
<td>
#if ($spmn.lineage == 'New' and $spmn.collectionEvent.time)
<span>$dateFmt.format($spmn.collectionEvent.time)</span>
#elseif ($spmn.createdOn)
<span>$dateFmt.format($spmn.createdOn)</span>
#end
</td>
<td>
#if ($spmn.storageLocation.name)
<span>$spmn.storageLocation.name</span>
#if ($spmn.storageLocation.mode == 'TWO_D')
<span>($spmn.storageLocation.positionY, $spmn.storageLocation.positionX)</span>
#elseif ($spmn.storageLocation.mode == 'LINEAR')
<span>($spmn.storageLocation.position)</span>
#end
#end
</td>
</tr>
#end
</tbody>
</table>
....
.... |
Manifest PDF View 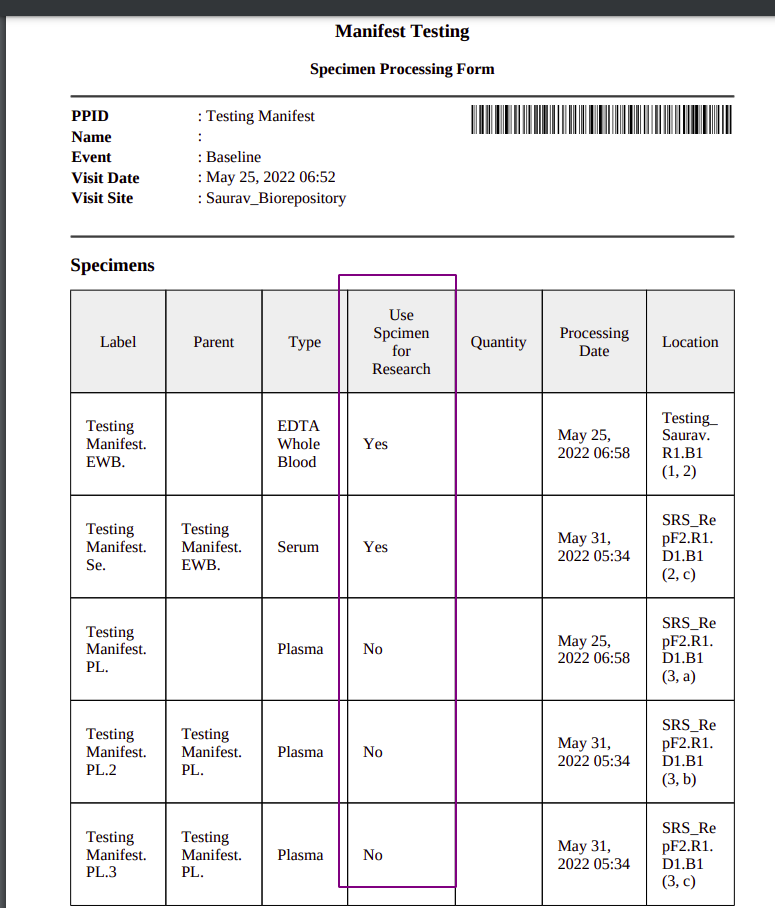  
|
Delete Manifest Template
You can only delete the protocol/distribution/project specific template from their respective level. You cannot delete the default manifest template attached to the system’s setting.
Steps to delete protocol/distribution/project specific template
Delete Specimen Manifest Template at the protocol level Go to the Homepage → Collection Protocol → Choose the CP of your choice → View CP Details On the CP overview page, click on the “More” → Delete Specimens Manifest
CP Overview Page 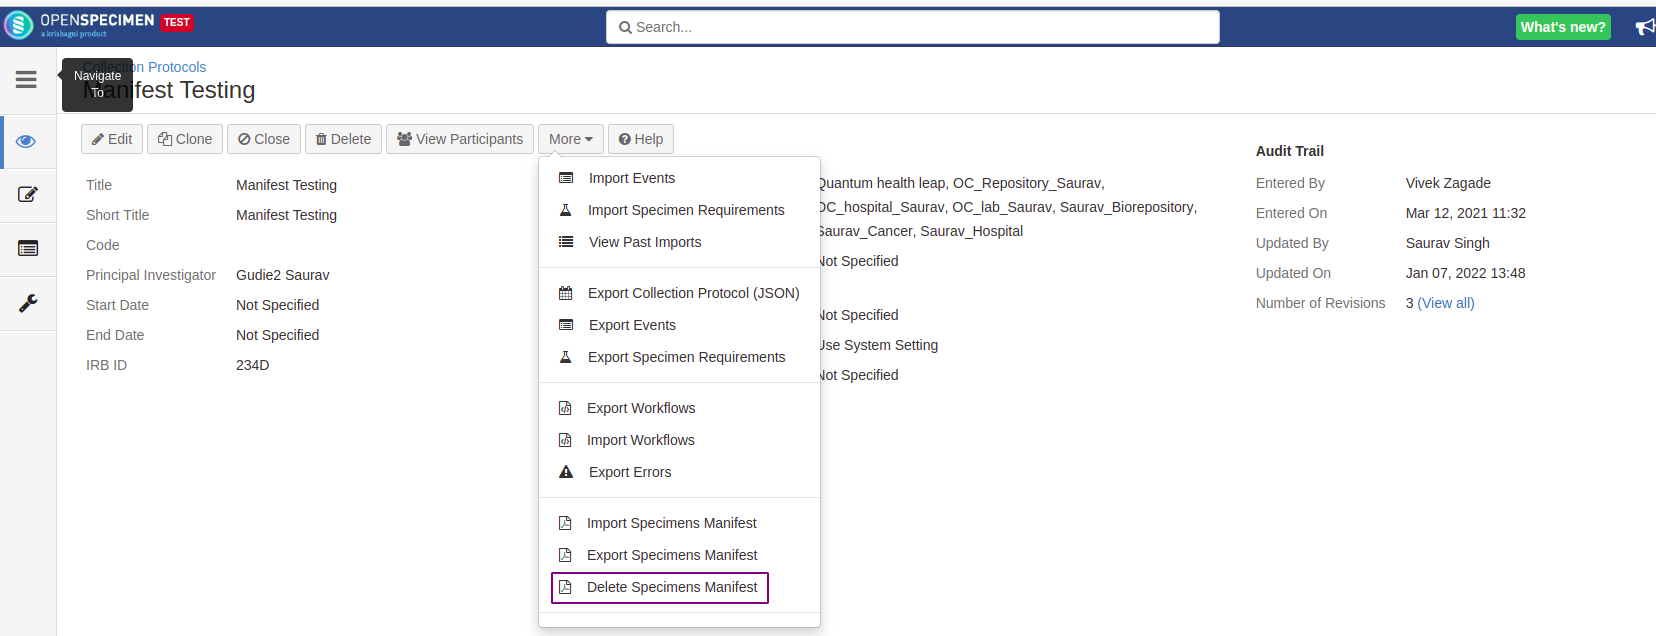 Delete order manifest at the distribution level Go to the Homepage → Distribution→ Choose the DP of your choice On the DP overview page, click on the “Manifest” → Delete Template
DP Overview Page  Delete request manifest at the project level Go to the Homepage → Project → Choose the Project of your choice On the Project overview page, click on the “Manifest Template” → Delete
Project Overview Page  |
Supported Fields
Specimen manifest
Specimen Manifest Supported Fields
Order manifest
Order Manifest Supported Fields
FAQ
1. Would it be possible to escape all special characters within a text at once?
Ans: From OpenSpecimen v10.x, special characters are skilled automatically in default manifest templates. However, for earlier versions, you can use CDATA.to avoid the overhead of escaping each special character
Syntax
<![CDATA[Statement]]>
Example:
    <div>
      <ol style="font-size: 13px; padding-left: 13px;">
        <caption style="text-align: left; font-size: 13px; margin-left: 0px;"><u><b>Processing Notes:</b></u></caption>
        <li><![CDATA[Inequality Synmbols: >,<,>=,<=]]></li>
      </ol>
</div> |
|
2. Would it be possible to page break or start a new page?
Ans: Yes. Please add the following HTML wherever you want a page break or new page should be started.
Syntax
<div style="page-break-after:always"></div>
Example:
#foreach ($spmn in $allSpecimens)
      <div style="page-break-after: always;"></div>
        #if ($visit.extensionDetail.attrsMap.service_request && $spmn.lineage == 'New' && $spmn.collectionEvent.time && ($spmn.label.startsWith("P1") || $spmn.label.startsWith("P6")))
          <tr>
            <td class="label">First Name</td>
            <td>: <![CDATA[$cpr.participant.firstName]]></td>
          </tr>
          <tr>
            <td class="label">Last Name</td>
            <td>: <![CDATA[$cpr.participant.lastName]]></td>
          </tr>
          <tr>
              <td class="label">MRN</td>
              <td>: <![CDATA[$cpr.participant.empi]]></td>
          </tr>
          <tr>
              <td class="label">Date of Birth</td>
              <td>: $dateOnlyFmt.format($cpr.participant.birthDate)</td>
          </tr>
          <tr>
              <td class="label">Participant ID</td>
              <td>: <![CDATA[$cpr.ppid]]></td>
          </tr>
          <tr>
            <td class="label">PI Name</td>
            <td>: <![CDATA[$cp.principalInvestigator.firstName $cp.principalInvestigator.lastName]]></td>
          </tr>
          <tr>
            <td class="label">PI Email</td>
            <td>: <![CDATA[$cp.principalInvestigator.emailAddress]]></td>
          </tr>
          #foreach ($request in $visit.extensionDetail.attrsMap.service_request)
              #if (($spmn.label.startsWith("P1") && $request.service_requested == 'DNA Extraction') || ($spmn.label.startsWith("P6") && $request.service_requested == 'PBMC Processing'))
                <tr>
                  <td class="label">Service Requested</td>
                  <td>: <![CDATA[$request.service_requested]]></td>
                </tr>
                <tr>
                  <td class="label">Number of tubes</td>
                  <td>: <![CDATA[$request.number_of_tubes]]></td>
                </tr>
                <tr>
                  <td class="label">Volume in each tube</td>
                  <td>: <![CDATA[$request.volume_in_each_tube2]]></td>
                </tr>
                <tr>
                  <td class="label">Collection Date</td>
                  <tr>: <![CDATA[$dateFmt.format($spmn.collectionEvent.time)]]></tr>
                </tr>
                #if ($request.comments)
                  <tr>
                    <td class="label">Comments</td>
                    <td>: <![CDATA[$request.comments]]></td>
                  </tr>
                #end
              #end
          #end
          <tr>
            <td>----------------------------------------------------------------------------------</td>
            <td>-----------------------------------------</td>
          </tr>
        #end
#end |
|


