Got feedback or spotted a mistake?

Leave a comment at the end of this page or email contact@krishagni.com

Skip to end of metadata
Go to start of metadata

You are viewing an old version of this page. View the current version.

Compare with Current View Page History

« Previous Version 27 Current »

Introduction

To ensure data privacy and minimize data vulnerability, OpenSpecimen provides an option to encrypt the MySQL database "at rest" and "in transit".

  • At Rest: Ensures the database files are in an encrypted format on the disk.

  • In Transit: Ensures the data passing through the network to the application is encrypted.

In both techniques, the malicious user won't be able to decrypt data.

Encrypting Data At Rest

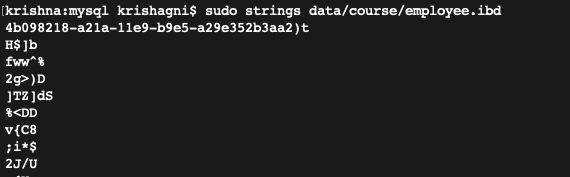
In the database, all the patient data is stored in data files. There is a chance that an attacker can retrieve sensitive data if they get direct access to such files. To avoid this, one can encrypt the data files using the keyring plugin provided by MySQL.

The keyring file is the main file that stores key using which the tablespace (where all table data files are stored) is encrypted. The keyring plugin is used for this purpose.

Before encryption: Data is in a human-readable format.

After encryption: Data is encrypted.

Step 1: Enable the keyring plugin

 Click here to expand...

Add below line under the [mysqld] section in my.cnf/my.ini file and restart the MySQL service.

For Linux:

[mysqld]
early-plugin-load=keyring_file.so

The default location of keyring file: /var/lib/mysql-keyring/keyring

For Windows:

[mysqld]
early-plugin-load=keyring_file.dll

The default location of the keyring file: C:/Program Files/MySQL/MySQL Server 5.7/keyring/keyring

Note: If a customer wants to generate the keyring file on any particular location/drive then provide the absolute path in ‘keyring_file_data’ property. 

Step 2: Verify if the plugin is enabled or not

 Click here to expand...

The below query should give output as ‘Active’.

SELECT 
  PLUGIN_NAME, PLUGIN_STATUS
FROM 
  INFORMATION_SCHEMA.PLUGINS
WHERE 
  PLUGIN_NAME LIKE 'keyring%';

Once the plugin is activated, encrypt the table data using steps provided in the next section.

Step 3: Encrypt database tables

 Click here to expand...

i) To encrypt a database table we run ALTER TABLE <TABLE_NAME> ENCRYPTION=”Y”

ii)  Similarly, we’ll need to encrypt every table in the database. For this, we can generate a master-sql file, which will have the query to alter all the existing DB tables.

iii) Follow the below procedure to create a master-query.

mysql> USE <database_name>;
mysql> TEE encrypt_tables.sql;
mysql> SELECT CONCAT("ALTER TABLE `", TABLE_NAME,"` ENCRYPTION=\"Y\" ;") 
         as encryption_query
       FROM 
         INFORMATION_SCHEMA.TABLES
       WHERE 
         TABLE_SCHEMA="<database_name>" AND
         TABLE_TYPE="BASE TABLE";
mysql> NOTEE;
mysql> EXIT;

TEE: This command reads the standard input and writes it to the file as well as standard output.

iv) Remove the table structure and the select query captured in the ‘encrypt_tables.sql file using the below command.

grep -i "ALTER" encrypt_tables.sql | sed '1d' | sed 's/|//g' > processed_encryption_tables.sql

v) Again login into MySQL database and run the ‘source processed_encryption_table.sql’.

mysql> USE <database_name>;
mysql> SOURCE processed_encryption_table.sql

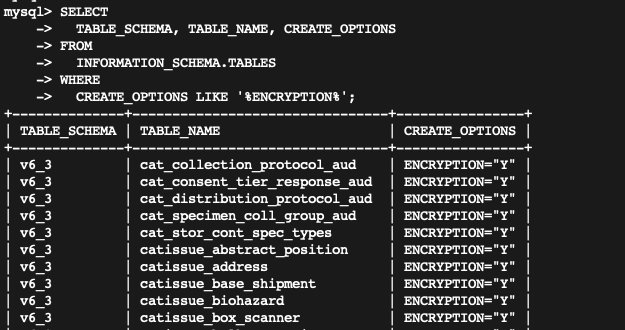
vi) Check if all tables are encrypted are not by noting ENCRYPTION="Y" flag under the CREATE_OPTIONS column.

SELECT 
  TABLE_SCHEMA, TABLE_NAME, CREATE_OPTIONS 
FROM 
  INFORMATION_SCHEMA.TABLES 
WHERE 
  CREATE_OPTIONS LIKE '%ENCRYPTION%';

Encrypting Data In Transit

In this step, we create self-signed SSL certificates for MySQL server to communicate using SSL. The certificate file is shared with the application so that it can store certificates in its TrustStore file and application can trust the MySQL server.

Step 1: Certificate creation

 Creating a CA Private Key and Certificate.

Generates a private key file:

openssl genrsa 2048 > ca-key.pem

Generates Certificate file:

openssl req -new -x509 -nodes -days 365000 -key ca-key.pem -out ca.pem

Both files are used by CA to create a self-signed certificate.

 Creating a Private Key and a Self-signed Certificate for MySQL.

Generates a private key and certificate request file:

openssl req -newkey rsa:2048 -days 365000 -nodes -keyout server-key.pem -out server-req.pem

After that, process the key to remove the passphrase using the ‘openssl rsa’ command.

openssl rsa -in server-key.pem -out server-key.pem

Lastly using the certificate request, CA's private key and certificate, generate a self-signed X509 certificate.

openssl x509 -req -in server-req.pem -days 365000 -CA ca.pem -CAkey ca-key.pem -set_serial 01 -out server-cert.pem

The server-cert.pem file is the self-signed certificate.

Step 2: Configure certificate in MySQL

In this step, we configure the SSL certificate files into the MySQL server. This will notify the MySQL about which certificate to use and enable security flags.

Each time when MySQL communicates with the application, the connection is secured using these certificate files.

 Configuring SSL files in MySQL.

i) Move the self-signed certificate and CA certificate files into the MySQL data directory.

ii) Open my.cnf/my.ini file and add below lines under the [mysqld] section and restart MySQL.

[mysqld]
ssl-ca=ca.pem
ssl-cert=server-cert.pem
ssl-key=server-key.pem
require_secure_transport=ON

Note

  1. To specify clients are required to use encrypted connections, the ‘require_secure_transport’ system variable is enabled.

  2. If the certificate files are not present in the MySQL data directory then specify the absolute (full) path of files.

Step 3:  Add the certificate in the Java TrustStore.

A Java TrustStore file holds certificates that authenticate other applications; for example, MySQL server. Using this file, OpenSpecimen will trust MySQL as a legit partner.

The JVM (client), look up the certificates in its TrustStore. If the certificate or Certificate Authorities presented by the MySQL is not in our TrustStore then the application gives an SSLHandshakeException and connection won’t be set up successfully.

 Linux: adding certificate to TrustStore

Create certs directory in $Tomcat/bin and copy the CA certificates file.

The below line adds the certificate file in JVM’s trust store file.

keytool -importcert -alias MySQLCACert -file ca.pem -keystore truststore -storepass mypassword

Both ca.pem and truststore files will be present in Tomcat/bin/certs directory.

Add this TrustStore file in Tomcat. Open setenv.sh file and add below line:

export JAVA_OPTS="$JAVA_OPTS -Djavax.net.ssl.trustStore=$TOMCAT/bin/certs/truststore -Djavax.net.ssl.trustStorePassword=mypassword -server"
 Windows: adding certificate to TrustStore

i) Open command prompt in administrator mode, and change directory to $JAVA_HOME\jre\lib\security path.

Note: Make sure to take a backup of the ‘cacerts’ file present in the security directory in case something went wrong.

ii) The below line adds the certificate file (ca.pem) in JVM’s TrustStore file.

"%JAVA_HOME%\jre\bin\keytool.exe" -import -trustcacerts -keystore cacerts -storepass changeit -noprompt -alias MySQLCACert -file "<path to CA certificate>\ca.pem"

Step 4: Enable encryption in Tomcat.

The useSSL=true property is added to the JDBC URL to communicate with the database via SSL. This property can be added to only connect if the database server supports SSL.

 Click here to expand...

i) Open the context.xml file and add "useSSL=true" property in url attribute of <Resource> tag.

url="jdbc:mysql://localhost:3306/openspecimen?useSSL=true"

ii) Once the configuration is done restart the Tomcat service to reflect the changes.

The <Resource> tag in context.xml will look like below:

<Resource name="jdbc/openspecimen" auth="Container" type="javax.sql.DataSource"

    maxActive="100" maxIdle="30" maxWait="10000"

    username="openspecimen" password="password" driverClassName="com.mysql.jdbc.Driver"

    url="jdbc:mysql://localhost:3306/os_test?useSSL=true"

    validationQuery="SELECT 1" testOnBorrow="true"

  />

To check if the configuration is done properly, login in MySQL, and run ‘status’ command.

In front of SSL ‘Cipher in use is DHE-RSA-AES256-SHA’  will be displayed.


  • No labels